
|
The Internet's Largest and Fastest Growing Engraving Community
Discuss hand engraving using basic to the most advanced methods and equipment
Forum Members: 14,738. Welcome to our newest member, nephilim
EngravingForum.com -
Domain since Feb 7, 2003
 Graver Video Conferencing is empty Join now!
|
|||||||
| ENGRAVING TOOLS - Paypal accepted | Classes | Glossary | Feedback | Tips | Sharpening | Bulino | Videos | Forum Policies |
 |
|
|
Thread Tools |
|
#1
 02-15-2009, 07:22 PM
|
||||
|
||||
|
This is a look at one way of sharpening tools using the Lindsay templates. I am using the deep line, banknote template. For most of my sharpening I now use an inexpensive table top drill press with mandrels (available through Lindsay Engraving Tools) to hold my grinding discs starting at 100 grit down to 2,000 depending on the tool I run these between 1200 and 2400rpm for roughing, 400to 600 for lighter grinding like faces and heels or switch to the bench hones. First I set my table so that the surface of the wheel and the table where the base of my template will set is ½ inch different in height, I use the Lindsay diamond hone as a reference as it is ½ inch.
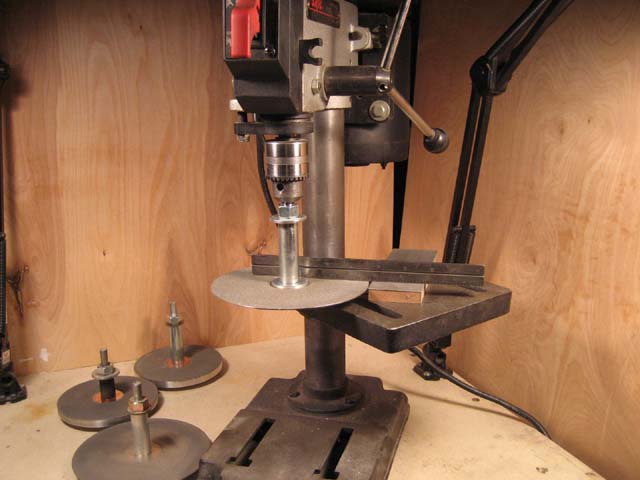 On the first grind I remove metal on one side until the new angle is about 3/8 inch back from the tip 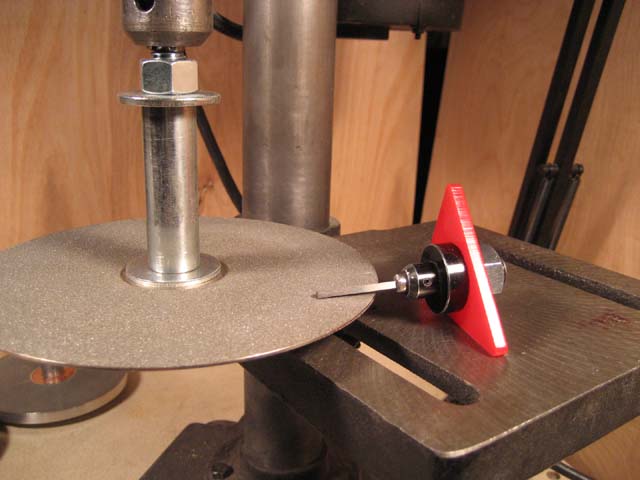 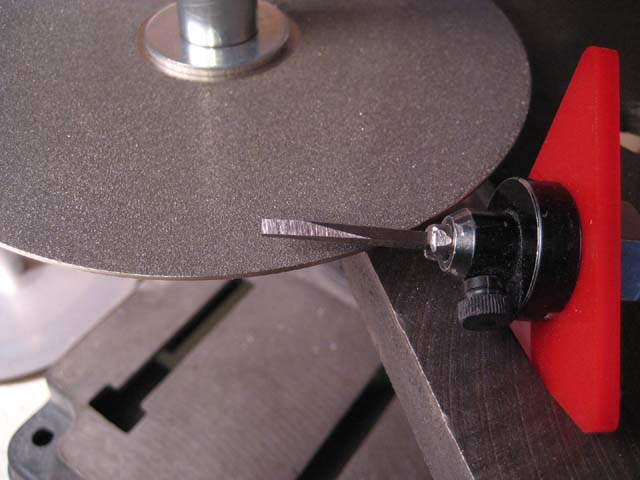 The second grind is made until it is even with the first as viewed from the bottom 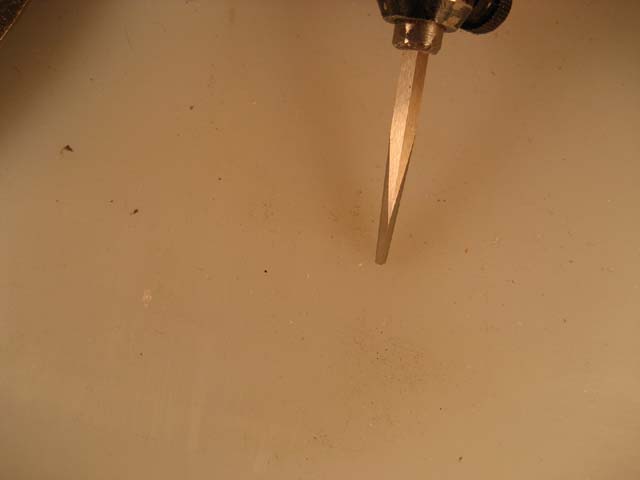 The third grind is to remove excess metal from the top of the tool, I make this a little smaller then needed because when I put the face on it will become larger 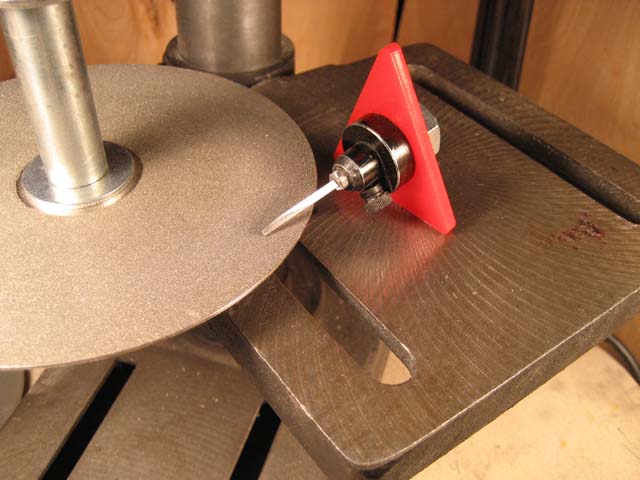 The forth and last grind for the banknote tool is done with the larger template and the Lindsay 2,000 grit bench hone 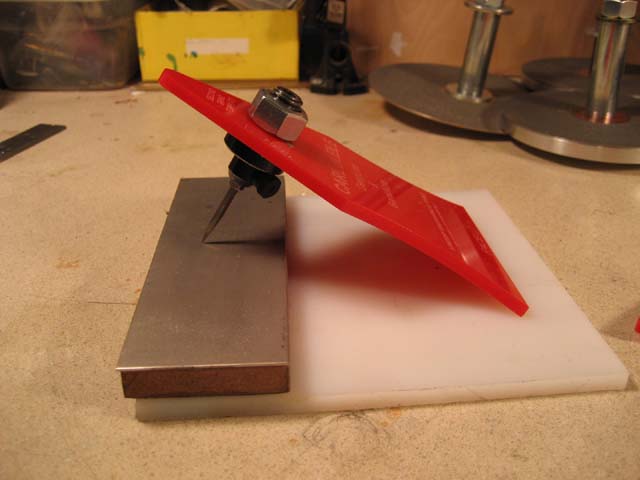 after getting the size face needed 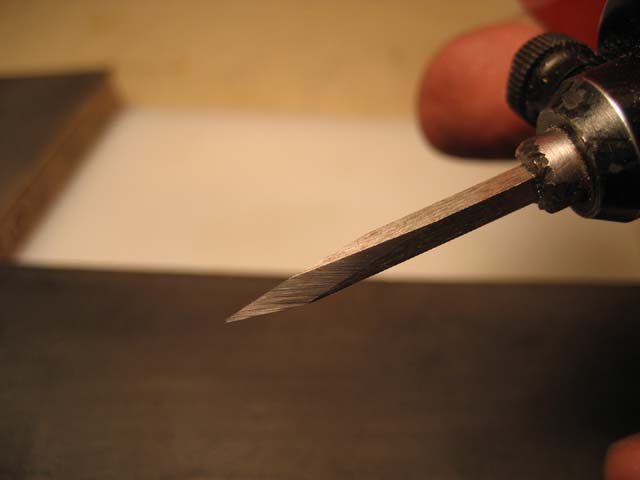 I rub the tool back and forth on a piece of leather to remove any wire edges.  Lastly attach the tool  and make some test cuts. In the picture with the dime I’m showing the banknote tool tip next to a human hair sometimes the tip can be larger or smaller depending on the work and type of metal to be cut. 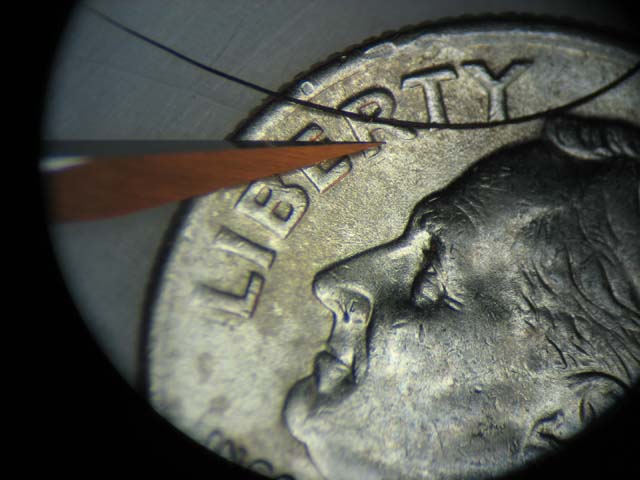 For the Deep Line Tool I use the large template and make the face bigger 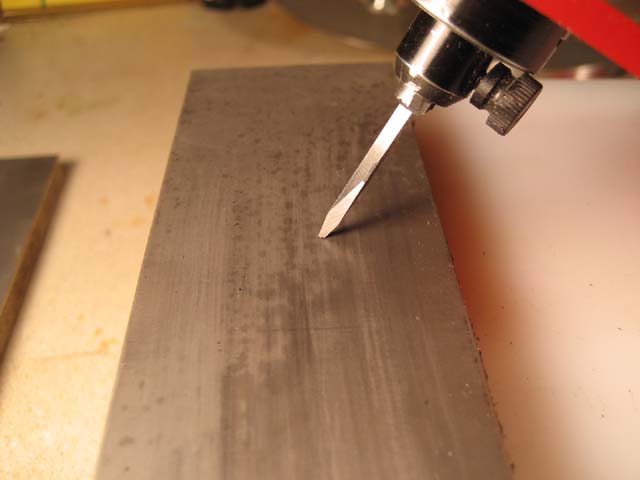 and add heels 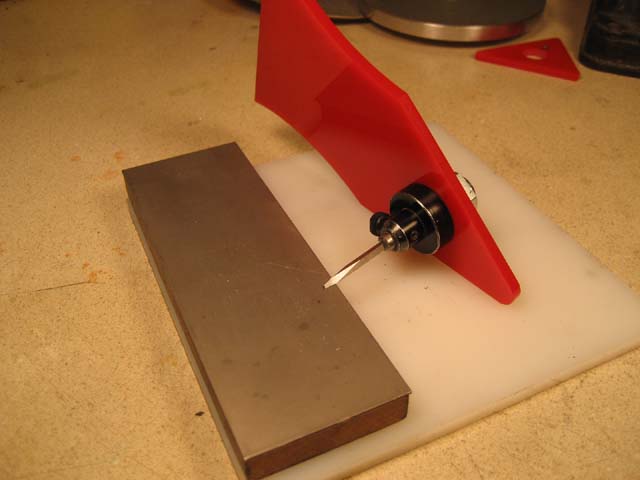 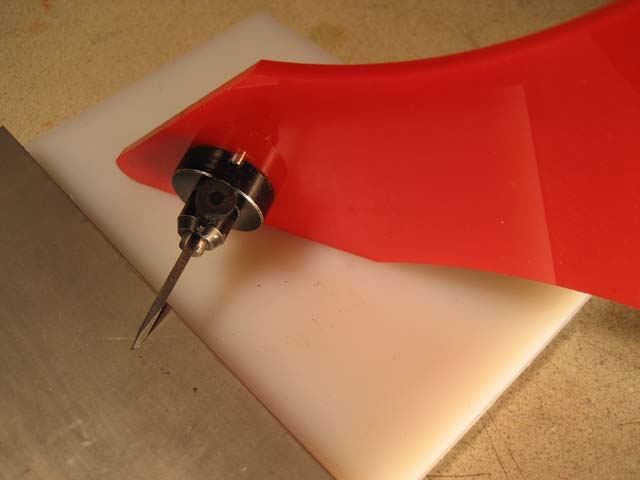 I made the heels larger than needed to show up in the picture 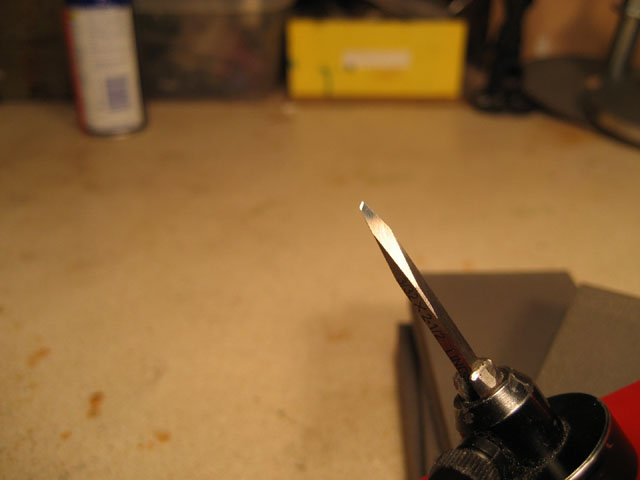 For extra strength or inlaying gold I will put a radius on the bottom and face to match the work I am doing. 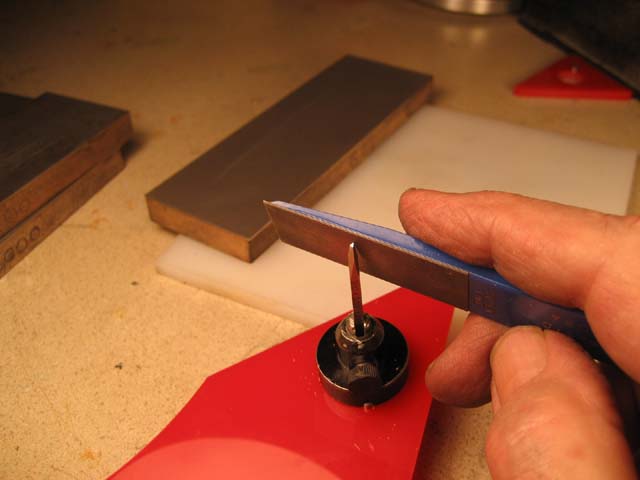 Hope this will help, questions welcome. I’ll be showing the other templates soon and how all the tools cut, Carl Bleile Southwest, Ohio 
|
|
#3
02-15-2009, 09:56 PM
|
||||
|
||||
|
Carl's training and experience as, not only an artist, but a skilled tool and die maker is what sets him apart from me and alot of other engravers. He still amazes me with some of the things he invents or modifies. When he was about 10 years old he took apart our dad's stopwatch and caught holy hell. Dad scared me out of such misadventures but it didn't stop Carl. Of course now when he takes something apart he can put it back together (usually modified to his needs).
Carl's brother
__________________
C. Roger Bleile Author of: American Engravers series of books. FEGA Historian and Founding Charter Member http://www.engravingglossary.com/
|
|
#4
02-15-2009, 09:58 PM
|
||||
|
||||
|
Fantastic Carl and very simple.
No more "rubbing" that metal away at 260 rpms on a Powerhone either. by the way ... you did one heckuva job neatening up that corner of the shop :smile[2]:
|
|
#5
02-16-2009, 10:47 AM
|
||||
|
||||
|
Carl, thanks for going to the trouble to show us making this tool. But I am confused on which part is the actual heel.
Also since some of us dont have the lindsay sharpening system, could you possibly give us the angles of each grind so we also can make your tools? That would be remarkable. I have had no luck with any of the undercutting tools for gold inlays and its making me crazy since im engraving a job with plenty of gold inlays  . I spend more time trying to undercut good channels but all the pounding and the gold falls right out. Any help would be very much appreciated. Thanks again for putting all this time to show us how your tools are made and what uses they provide. Thank you, thank you. Tim . I spend more time trying to undercut good channels but all the pounding and the gold falls right out. Any help would be very much appreciated. Thanks again for putting all this time to show us how your tools are made and what uses they provide. Thank you, thank you. Tim
|
|
#6
02-16-2009, 10:55 AM
|
||||
|
||||
|
That's a great post Carl and the pictures are wonderful too.
|
|
#7
02-16-2009, 12:20 PM
|
||||
|
||||
|
Carl you have showed something that I have never thought of to sharpen gravers and allot of others...
Thanks, Jerry
|
|
#8
02-16-2009, 01:16 PM
|
||||
|
||||
|
Thanks very much for the pictures of your drillpress sharpening system. I have been trying to figure that out for a while, but never thought of putting a wheel on a press "upside down" like that. It makes perfect sense now. Also, I have already incorperated the number on the sides of the bench stones for easy identification, such a great idea. If we still had a thank you button, I would have clicked it.
 -Chapi
|
|
#9
02-17-2009, 01:04 AM
|
|||
|
|||
|
Carl,
This is an excellent post! Nice idea to sling the diamond laps from the drilling or vertical milling machine to do high rpm hogging of blanks. As we know, if you have a milling machine, you can wind the half inch height adjustment with ease. Wonderfully clear pictures! best Rod
|
|
#11
02-17-2009, 06:29 PM
|
||||
|
||||
|
Thanks guys
airamp,jlseymour,Chapi,Peter, glad I could help, if there is anything I could do to make things clearer let me know. Chris, I was rubbing on a bench stone at 260 s.p.m.(grinding first) for years and couldn't see power hones and fixtures saveing time, the Lindsay templates are stright forward and get it done. AS for my shop it is always neet and clean  you were just in there on a bad day. you were just in there on a bad day.Tim,I'm an old time cutter and did all my sharpening by hand,I have never used an adjustable fixture so I don't know the angles, I ground them as usual and sent them to Steve he figured out the templates, I do know the V is 50 degrees. Mack, I wouldn't be surprised if you made a fixture with wheels,head light and turn signals. Rod,I don't like wasting time grinding tools, and you are right about the milling machine, I'm just to lazy to clean it up every time. Roger, didn't I tell dad you did it Carl Bleile southwest,Ohio
|
|
#12
02-19-2009, 02:48 PM
|
||||
|
||||
|
Carl and I have been tweaking his templates. I've had a third set of prototypes cut and a few minutes ago I tried grinding gravers with the set. They are right on the button! Third time is a charm! I gave the go ahead to start a production run. The first batch should be ready to ship out early next week. I added them to the tool site overview page. They still need to be added to the sharpener page, but for now they can be ordered from the overview page http://www.handgravers.com/Engraving_Tools_Overview.htm
Thanks to Carl for help with his points and templates. I am honored he has provided his points this way and sharing his knowledge. Thanks again Carl!  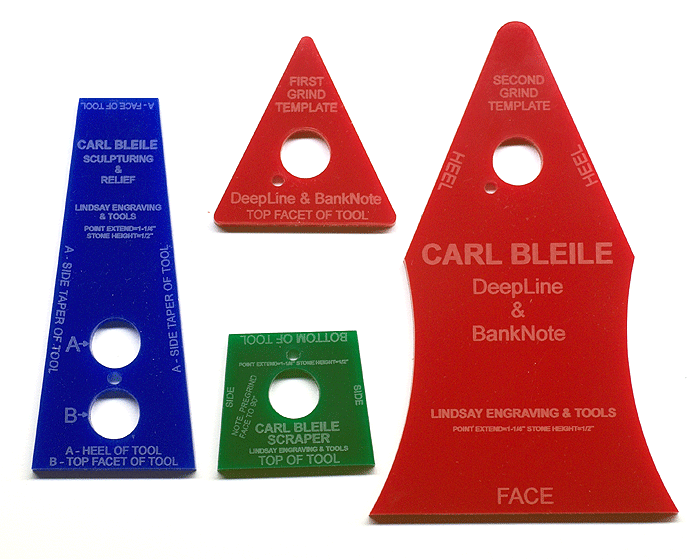
__________________
__________________________________ Steve Lindsay AirGraver.com EngravingArtist.com
|
|
#13
02-20-2009, 03:45 PM
|
||||
|
||||
|
Carl...What a clever set-up. I have found that the templates are super accurate & the chisels that I have produced so far are right on the money. I will definitely be ordering the Banknote. Last week-end at the gun show a couple of my students stopped by and I was showing them the templates, & how simple they were to use. Carl keep up the good work!
Yours truly, JJ Roberts www.jjrobertsengraver.com
|
|
#14
02-27-2009, 02:11 PM
|
||||
|
||||
|
I will be buying an additional bench and a $50 bench drill press from Harbor Freight this weekend.
It is my understanding that this setup will nut function properly in a press with a bent chuck/shaft or bad bearings. If the cheap press from Harbor Freight works great, then that's money well spent for a sharpening setup that is easy and FAST. Will report back later on how well the El Cheapo press performs ..... Chris
|
|
#15
02-27-2009, 02:38 PM
|
||||
|
||||
|
I think this is the drill press Chris is talking about(it's on sale), I took a picture of it at Harbor Freight with my phone.
Carl Bleile Southwest, Ohio
|
|
#16
02-27-2009, 03:54 PM
|
||||
|
||||
|
Chris,
If you say the El Cheapo HF press works OK, I think I'll get one to free up my big drill press. Roger
__________________
C. Roger Bleile Author of: American Engravers series of books. FEGA Historian and Founding Charter Member http://www.engravingglossary.com/
|
|
#17
02-28-2009, 04:18 PM
|
||||
|
||||
|
The thing I like about the drill press is power and speed. It's also possible to make tool adjustments by raising or lowering the table.
Carl Bleile southwest,Ohio
|
|
#18
02-28-2009, 06:10 PM
|
||||
|
||||
|
The thing I would like about that drill press is if I could get one. 150 miles round trip, out of stock .... and no new bench. Called another location and no 5" press either. Could've cruised through 3 gun shows in the same distance and time. Oh well ... par for the course in this "geographical oddity".
If HF is out of a sale item, they'll write out a discount coupon so when it does come in, you still get the sale price. Don't buy the larger 8" press from HF 'cause you can get a 10" Skil press at Lowes for just 15 bucks more. ..... I'll check in as soon as I get the press.
|
|
#19
03-01-2009, 09:40 PM
|
||||
|
||||
|
Quote:
__________________
C. Roger Bleile Author of: American Engravers series of books. FEGA Historian and Founding Charter Member http://www.engravingglossary.com/
|
|
#20
04-04-2009, 01:43 PM
|
||||
|
||||
|
This thread is being bumped ....
You are exactly right Roger. A great film!!! ------- New bench (60" X 30" X 36") - $100 bucks in lumber (including oak plywood top) and 3.5 hours of basic carpentry. New drill press - $98 bucks from Lowes .... discounted as it was the display model. The cheapo press from Harbor Freight is always out of stock. The mandrel and 100 grit disk are on their way. (The check is in the mail Steve.  ) ) I can't wait as grinding metal, to shape gravers, at a painfully slow Powerhone rate is .... well, painful. Sooop ... I patiently wait for the FedEx guy wearing wingtip shoes ...  
|
|
#21
04-04-2009, 03:29 PM
|
||||
|
||||
|
Chris,
I got a raincheck for the cheapo drill press at Harbor Freight but they never get one. I'm about to give up on them like you did. ROger
__________________
C. Roger Bleile Author of: American Engravers series of books. FEGA Historian and Founding Charter Member http://www.engravingglossary.com/
|
|
#22
08-27-2009, 11:28 AM
|
|||
|
|||
|
i'm confused by the rounded part on the deep line template.....
are we meant just to ignore that part?
|
|
#23
11-10-2009, 08:42 PM
|
||||
|
||||
|
Carl, the grinds and look of your banknote deep relief tool looks really weird. I cant wait to see how one works. Again thanks so much for sharing your tools.
|
|
#24
11-15-2009, 06:03 AM
|
||||
|
||||
|
Are your sharpening templates available? btw I love the turorial on deep relief sculpting.... very helpful!
|
|
#25
11-15-2009, 10:24 AM
|
|||
|
|||
|
Quote:
Apologies to all.Steve as this batch has been tweaked (made better and improvised I presume) in relation the previous lots.To someone who already has the earlier batch what will the difference be ? And how can I do the same tweaking on my set? I have the full set of Carl B templates. SE 
__________________
Learn from those who know more than you do and teach those who know less than you do. - I.M.
|
|
#26
10-08-2010, 08:01 AM
|
|||
|
|||
|
I new tring to get started. I saw the drill press adapter and the bench stone technique. That seem the way for me also. I don't have alot of money to start with and this gives me a cost effective way to get started sharpening and cutting practice plates. Thanks for the tutorial and info. Clay

|
|
#27
10-08-2010, 11:09 AM
|
||||
|
||||
|
Quote:
Sharpening a graver by hand isn't a problem - you hardly take any metal off under normal circumstances. And if you've managed a big enough broken point you do need to take off a lot of metal then you're back to the shaping, aren't you?
|
|
#29
01-23-2014, 10:59 PM
|
||||
|
||||
|
Thank you
i will have to try that in the near future when i get more experience. Thanks, Omar
|
|
#30
01-24-2014, 01:19 AM
|
|||
|
|||
|
Quote:
Hi Omar, I would suggest you get the Carl B template set now and as you progress you will get better and get used to them,that is just advise. SE
__________________
Learn from those who know more than you do and teach those who know less than you do. - I.M.
|
|
#31
01-28-2016, 10:11 AM
|
|||
|
|||
|
What an idea................cool
|
|
#32
03-16-2019, 09:34 AM
|
|||
|
|||
|
Mr Bleile, just curious as to the color of the templates. I bought a set of the DeepLine & Banknote templates from a friend and they are a blue plastic. Is there a difference between the blue and red color?
Thanks Jerry
|
|
#33
03-16-2019, 11:37 AM
|
||||
|
||||
|
Hi Jerry, No difference, just color.
__________________
__________________________________ Steve Lindsay AirGraver.com EngravingArtist.com
|
|
| Bookmarks |
| Thread Tools | |
|
|


